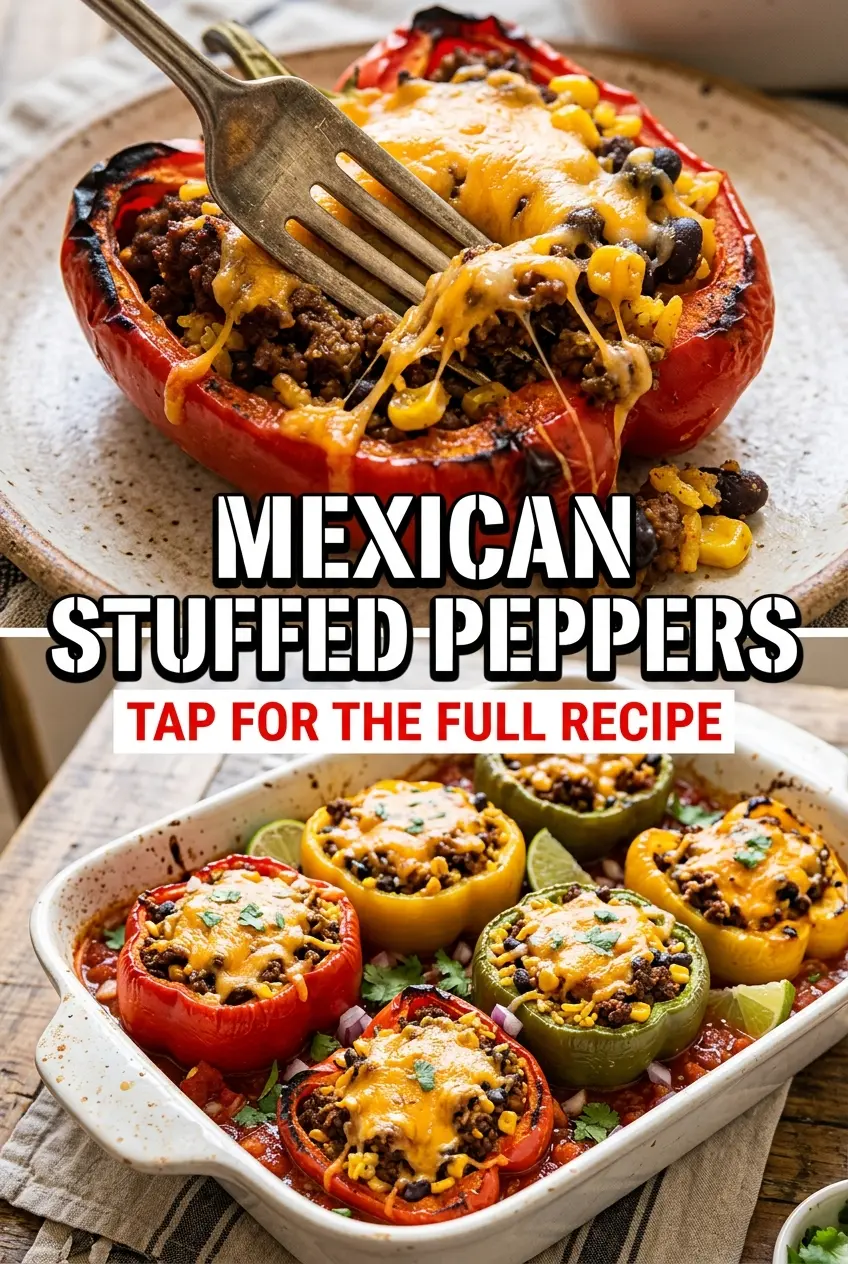
Roasted peppers, a savory beef-and-rice filling, and a blanket of melted cheese turn these Mexican stuffed peppers into the kind of dinner that disappears fast. The peppers stay tender but still hold their shape, and the filling is hearty enough to stand on its own without feeling heavy. What makes this version work is the balance: smoky char on the outside, seasoned meat and beans inside, and enough salsa to keep everything juicy in the oven.
The trick is starting with properly roasted peppers. If they aren’t charred and steamed before stuffing, they stay too firm and can taste flat after baking. The filling also gets a quick simmer in the skillet before it goes into the peppers, which helps the rice and beans soak up the salsa instead of tasting like separate ingredients piled together. That little bit of pre-cooking makes the finished dish slice cleanly and hold together on the plate.
You’ll find a few practical notes below on how to keep the peppers intact, what to swap if you want a lighter version, and how to avoid a watery filling. It’s the kind of dinner that looks like you put in far more effort than you actually did.
The peppers softened just enough without falling apart, and the filling stayed chunky and flavorful instead of turning mushy. I loved that the rice soaked up the salsa while the cheese browned on top. My husband went back for seconds and asked if I could put this in our regular dinner rotation.
These Mexican stuffed peppers keep their shape, bake up cheesy, and make a hearty one-pan dinner worth pinning for busy nights.
The Reason These Peppers Stay Tender Without Going Mushy
Stuffed peppers fail when the pepper and filling are both trying to cook from raw at the same time. The filling dries out before the pepper softens, or the pepper turns limp while the center still tastes underseasoned. Roasting the peppers first solves the timing problem. You get a softened shell with enough structure left to hold the filling, and the oven finish becomes a quick melt-and-merge stage instead of a long bake that overcooks everything.
The other important piece is using a filling that already tastes finished before it goes into the pepper. Rice, beans, salsa, and cheese all get stirred together while the skillet is still warm, so the mixture holds moisture and seasoning. If your filling seems a little loose in the pan, that’s fine. It tightens in the oven, and a dry filling is much harder to fix than a slightly saucy one.
What Each Ingredient Is Actually Doing in This Dish
Poblano or bell peppers give you the structure and the contrast. Poblanos bring a mild smoky edge and a more traditional Mexican feel, while bell peppers are sweeter and a little easier to find. Use whichever you prefer, but choose peppers that sit upright and have thick walls, because thin peppers collapse faster in the oven.
Ground beef builds the savory base. A lean-to-moderate fat ratio works best because it keeps the filling moist without making it greasy. If you swap in ground turkey or chicken, add a little extra salsa or a spoonful of oil so the mixture doesn’t taste dry after baking.
Oaxaca or mozzarella cheese gives you the melt. Oaxaca stretches better and tastes a little creamier, but mozzarella is a practical substitute that still browns well. Salsa roja is doing more than seasoning here — it adds moisture, acidity, and chili flavor all at once. Use a salsa you’d actually eat on its own, because bland salsa makes a bland filling.
Rice, black beans, and corn stretch the filling and give it a better texture. The rice absorbs the salsa, the beans add body, and the corn brings a little sweetness that keeps the dish from tasting one-note. If you need to use leftover rice, break up any clumps before stirring it in so the filling mixes evenly.
Building the Filling So It Bakes Up Juicy, Not Watery
Roasting the Peppers First
Put the peppers directly over a gas flame or under the broiler until the skins blister and blacken on most sides. You’re not cooking them through here; you’re loosening the skin and jump-starting the softening. Once they go into the bag to steam, the charred skin slips off much more easily. If you skip the steaming step, you’ll end up scraping at half-cooked skin and tearing the pepper.
Cooking the Beef and Aromatics
Brown the beef with the onion until the meat loses its pink color and the onion turns translucent with a little edge of gold. Add the garlic at the end so it stays fragrant instead of bitter. If you see a lot of fat pooling in the pan, spoon off the excess before adding the rest of the filling. Too much fat makes the peppers slip and the bottom of the dish turn oily.
Finishing the Filling Before It Goes In
Stir in the rice, beans, corn, half the cheese, salsa, tomato, cumin, salt, and pepper, then let the mixture simmer for a few minutes. You want it thick enough to mound on a spoon, not soupy. That short simmer is where the flavors marry and the excess moisture cooks off. If the filling looks thin in the skillet, it will look thin in the baked peppers too.
Baking Until the Cheese Blisters
Spoon the filling into each pepper, arrange them in a baking dish, and top with the remaining cheese. Bake just until the cheese melts and the peppers are hot all the way through. Overbaking is the easiest way to ruin the texture, because the filling dries out and the peppers collapse. Pull them once the cheese is fully melted and the edges are starting to brown.
Three Ways to Make These Stuffed Peppers Fit What You Have
Make Them Dairy-Free Without Losing the Comfort Factor
Skip the cheese in the filling and on top, then finish the peppers with avocado, cilantro, and a spoonful of salsa after baking. You lose the browned cheese cap, but you keep the savory, satisfying center. If you want a creamy element, add a little mashed avocado at serving instead of trying to bake a dairy-free cheese substitute that won’t melt the same way.
Use Ground Turkey for a Lighter Filling
Ground turkey works well here, but it needs help staying juicy. Add a teaspoon of oil to the skillet and don’t overcook it before the rice and salsa go in. The flavor will be a little cleaner and less rich than beef, which lets the cumin and salsa come forward more clearly.
Turn Them Vegetarian Without Rebuilding the Recipe
Leave out the beef and increase the black beans by another half cup, or add crumbled cooked tofu if you want more bite. The beans become the main source of body, so mash a few of them lightly in the pan to help the filling hold together. The result is softer than the beef version, but it still eats like a full meal.
Use Leftover Rice Without Drying Out the Filling
Leftover rice works well as long as it’s loosened before it goes into the skillet. If it’s dry from the fridge, splash in a little extra salsa or a spoonful of water so the grains can separate and absorb flavor. This is the easiest way to make the peppers feel like a planned dinner instead of a leftovers project.
Storage and Reheating
- Refrigerator: Store leftovers in an airtight container for up to 4 days. The peppers soften a little more as they sit, but the flavor deepens.
- Freezer: These freeze well. Cool completely, wrap each pepper tightly, and freeze for up to 2 months. Thaw overnight in the fridge before reheating so the center warms evenly.
- Reheating: Reheat covered in a 350°F oven until hot, about 15 to 20 minutes. The biggest mistake is using high heat, which dries out the filling before the center is warm.
Answers to the Questions Worth Asking
Mexican Stuffed Peppers
Ingredients
Equipment
Method
- Roast the peppers directly over a gas flame or under the broiler until charred all over, about 5 minutes, turning as needed so the skins blister evenly.
- Place the charred peppers in a plastic bag and steam for 10 minutes, until the skins look loosened and steamy inside.
- Peel off the charred skin and make a careful slit down the side, keeping the pepper intact so it can hold stuffing without breaking.
- Gently remove the seeds from each pepper, keeping the pepper cavity open and ready to fill.
- Brown the ground beef with the diced onion in a large skillet over medium-high heat until the beef is no longer pink.
- Add the minced garlic and cook for 1 minute, stirring, until fragrant.
- Stir in the cooked rice, black beans, corn, 1/2 cup cheese, salsa roja, diced tomato, cumin, salt, and pepper, and mix until the ingredients are evenly combined.
- Simmer the mixture for 5 minutes, stirring occasionally, until it thickens slightly and the flavors meld.
- Stuff each roasted pepper with the meat mixture and place them in a baking dish so they sit upright.
- Top with the remaining cheese and bake at 350°F for 20 minutes, until the cheese is melted and lightly browned at the edges.
- Let the peppers rest for 5 minutes, then garnish with chopped cilantro before serving.