This Epic Easter Egg Smash Cake is as fun to make as it is to eat! With layers of colorful cake and a yummy filling, it’s perfect for celebrations.
Who doesn’t love a cake that explodes with candy when you cut into it? 🎉 I love making this cake for family gatherings, and kids adore it! Just be ready for some delightful mess!
Key Ingredients & Substitutions
All-Purpose Flour: This is the main structure for your cake. If you’re looking for a gluten-free option, use a 1:1 gluten-free flour blend. I’ve had great results with this substitution!
Unsalted Butter: Softened butter gives the cake richness. If you’re in a pinch, you can use margarine, but for best flavor, stick with butter if you can. I only use unsalted to control the saltiness.
Granulated Sugar: This sweetens your cake. You can substitute with coconut sugar or brown sugar for a deeper flavor, but it might alter the color of your cake, making it darker.
Gel Food Coloring: The pastels make the cake festive! If you prefer natural options, use beet juice for red, turmeric for yellow, and matcha for green, although they won’t be as vibrant.
White Chocolate: For the shell, use good quality white chocolate for the best taste. If you’re dairy-free, look for dairy-free chocolate options available in stores.
How Do You Achieve the Perfect Cake Layers?
Baking cake layers can be a bit tricky, but a few tips can help. First, make sure your oven is preheated before you put the batter in. A consistent baking temperature is key!
- Use room temperature ingredients like butter and eggs; this ensures a smoother batter.
- Don’t overmix once you add flour. Mix until just combined to keep the cake light.
- Check for doneness with a toothpick; it should come out clean or with a few crumbs.
How Can You Make Buttercream Frosting That Isn’t Grainy?
Getting the right texture for buttercream is essential for smooth frosting. Start by beating the butter really well until it’s creamy before adding sugar. This makes a big difference!
- Gradually add sifted powdered sugar and mix on low to avoid a sugar cloud.
- Adding heavy cream helps create a smooth consistency—be careful not to add too much.
- Beat on high for at least 3-5 minutes for that light and fluffy texture.
What’s the Best Way to Create the White Chocolate Shell?
Making a white chocolate shell can be fun and easy! Ensure your chocolate is melted just right for an even coating.
- Melt in short intervals and stir well to avoid overheating.
- A little coconut oil makes it smoother and gives a nice sheen to the shell.
- Let it cool slightly before pouring to prevent it from sliding off the cake too quickly.
These tips will not only help you make your Epic Easter Egg Smash Cake beautiful but will also ensure it tastes amazing too! Happy baking!
How to Make Epic Easter Egg Smash Cake
Ingredients You’ll Need:
For The Cake Layers:
- 2 ½ cups all-purpose flour
- 2 ½ tsp baking powder
- ½ tsp salt
- 1 cup unsalted butter, softened
- 1 ¾ cups granulated sugar
- 4 large eggs
- 1 tbsp vanilla extract
- 1 cup whole milk
For The Buttercream Frosting:
- 1 ½ cups unsalted butter, softened
- 5 cups powdered sugar
- ¼ cup heavy cream or milk
- 2 tsp vanilla extract
- Gel food coloring (pastels: yellow, pink, purple, blue, green)
For The White Chocolate Shell:
- 14 oz white chocolate melts or chopped white chocolate
- 1 tsp coconut oil or vegetable oil (optional, for smoothness)
Decorations and Fillings:
- Mini candy Easter eggs (chocolate or sugar-coated)
- White meringue pieces
- Whipped cream or additional buttercream for top decoration
- Assorted colorful sprinkles
How Much Time Will You Need?
This delightful cake will take about 45 minutes to prepare, plus an additional 2 hours to cool and set. The total time is around 3 hours, including baking, chilling, and decorating. Perfect for a fun afternoon in the kitchen!
Step-by-Step Instructions:
1. Bake the Cake Layers:
First, preheat your oven to 350°F (175°C). Grease and flour three 8-inch round cake pans to prevent sticking. In a mixing bowl, whisk together the flour, baking powder, and salt. In a stand mixer, cream the softened butter and granulated sugar until light and fluffy. Add the eggs one at a time, mixing well after each addition, then stir in the vanilla extract. Gradually add the flour mixture and milk, alternating between them, starting and ending with the flour mixture. Be careful not to overmix—just combine until smooth.
Divide the batter evenly among the prepared pans and bake for 25-30 minutes. Check for doneness by inserting a toothpick into the center; if it comes out clean, they’re ready! Allow the cakes to cool completely in the pans before removing them.
2. Prepare Buttercream Frosting:
While the cakes are cooling, let’s make the buttercream frosting! In a mixing bowl, beat the softened butter until creamy. Gradually add the powdered sugar, alternating with the heavy cream (or milk), and continue mixing. Add the vanilla extract and beat until the frosting is light and fluffy. Divide the frosting into five portions and tint each with your pastel gel colors: yellow, pink, purple, blue, and green.
3. Assemble and Fill Cake:
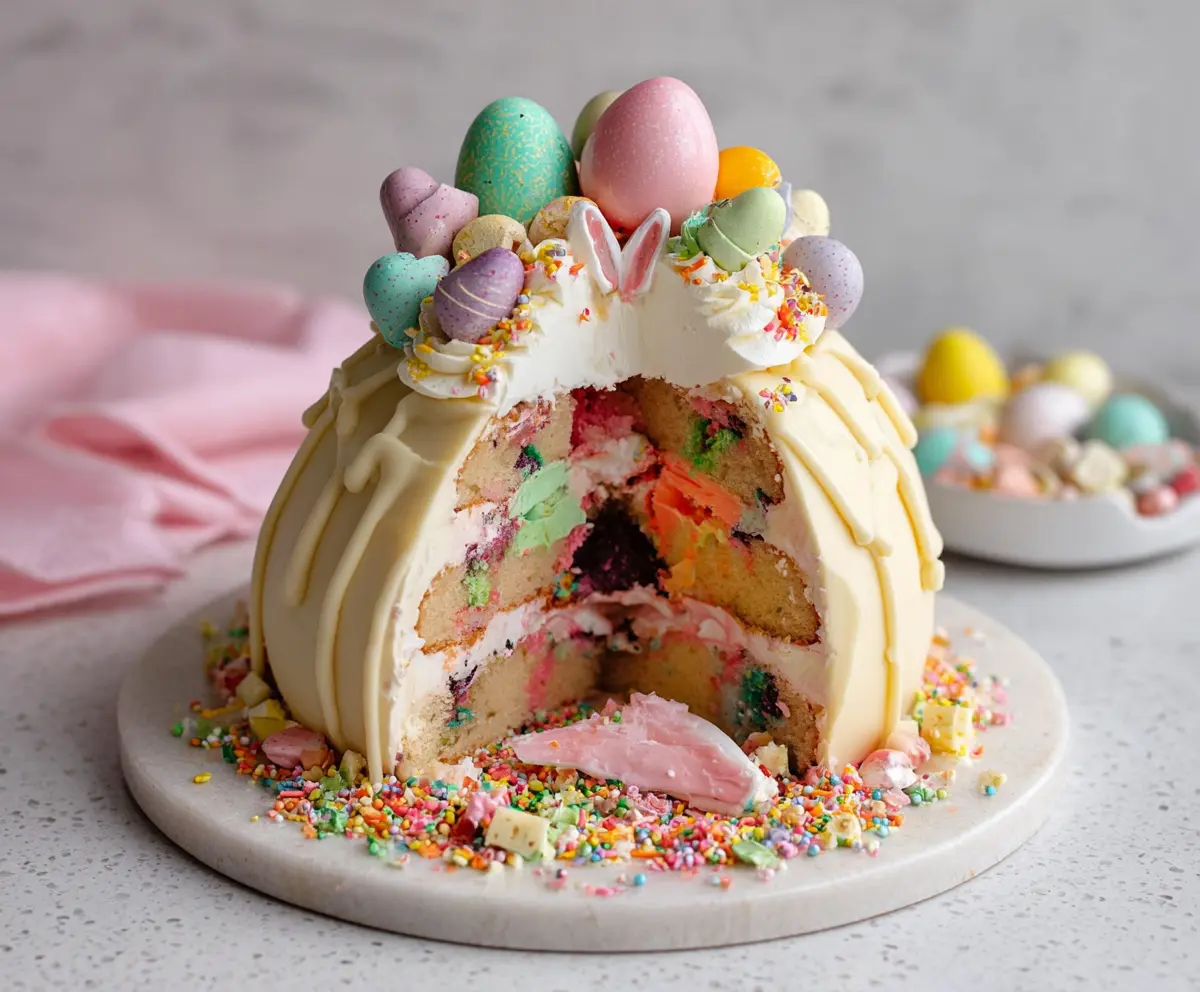
Once the cakes have cooled, level the layers if necessary to create an even surface. Spread a layer of tinted buttercream between each layer of cake. To add some fun, scatter mini candy eggs in the buttercream between the layers and use different colored buttercream to create colorful streaks or dots for surprise bites in the cake!
4. Form the Cake Dome:
After stacking all the layers, gently carve the sides to form a rounded dome shape. This will give your cake that perfect “egg” appearance! Once shaped, chill the cake in the refrigerator to firm it up.
5. Make White Chocolate Shell:
Now it’s time for the white chocolate shell! Melt the white chocolate with the oil in a microwave-safe bowl, heating in 20-second intervals and stirring in between until smooth. Allow the melted chocolate to cool slightly while still being pourable. Place the chilled cake on a round board or plate, then pour or brush a thick layer of melted white chocolate over the entire cake to coat it completely. Chill in the fridge again until the white chocolate hardens.
6. Decorate the Top:
Once the chocolate shell is set, it’s time to decorate the top! Pipe swirls of buttercream around the edge and add meringue shards and pastel mini eggs on top of the buttercream. Don’t forget to sprinkle some colorful sprinkles around the base of the cake for a festive look!
7. Serve:
To serve, cut into the cake to reveal the colorful buttercream and candy surprise inside. Encourage your guests to smash or crack the white chocolate shell for a truly fun and festive experience. Enjoy every delicious bite of your Epic Easter Egg Smash Cake!
Happy baking!
Can I Use a Different Type of Flour?
Yes! You can substitute all-purpose flour with a gluten-free flour blend if needed. Just make sure the blend is suitable for baking to ensure your cake rises properly.
How Do I Store Leftovers?
Store any leftover cake in an airtight container in the refrigerator for up to 3 days. You can also slice and freeze portions for up to 2 months—just wrap them tightly to prevent freezer burn!
Can I Use Milk Alternatives in the Frosting?
Absolutely! You can substitute whole milk with almond milk, coconut milk, or any other non-dairy milk in the frosting. Just remember that the flavor and texture may slightly vary, but it will still be delicious!
What If I Don’t Have Gel Food Coloring?
If you don’t have gel food coloring on hand, you can use liquid food coloring, but be cautious with the amount as it can change the consistency of your frosting. Alternatively, you can create natural colors with fruit or vegetable purees like beet for red, spinach for green, or turmeric for yellow.