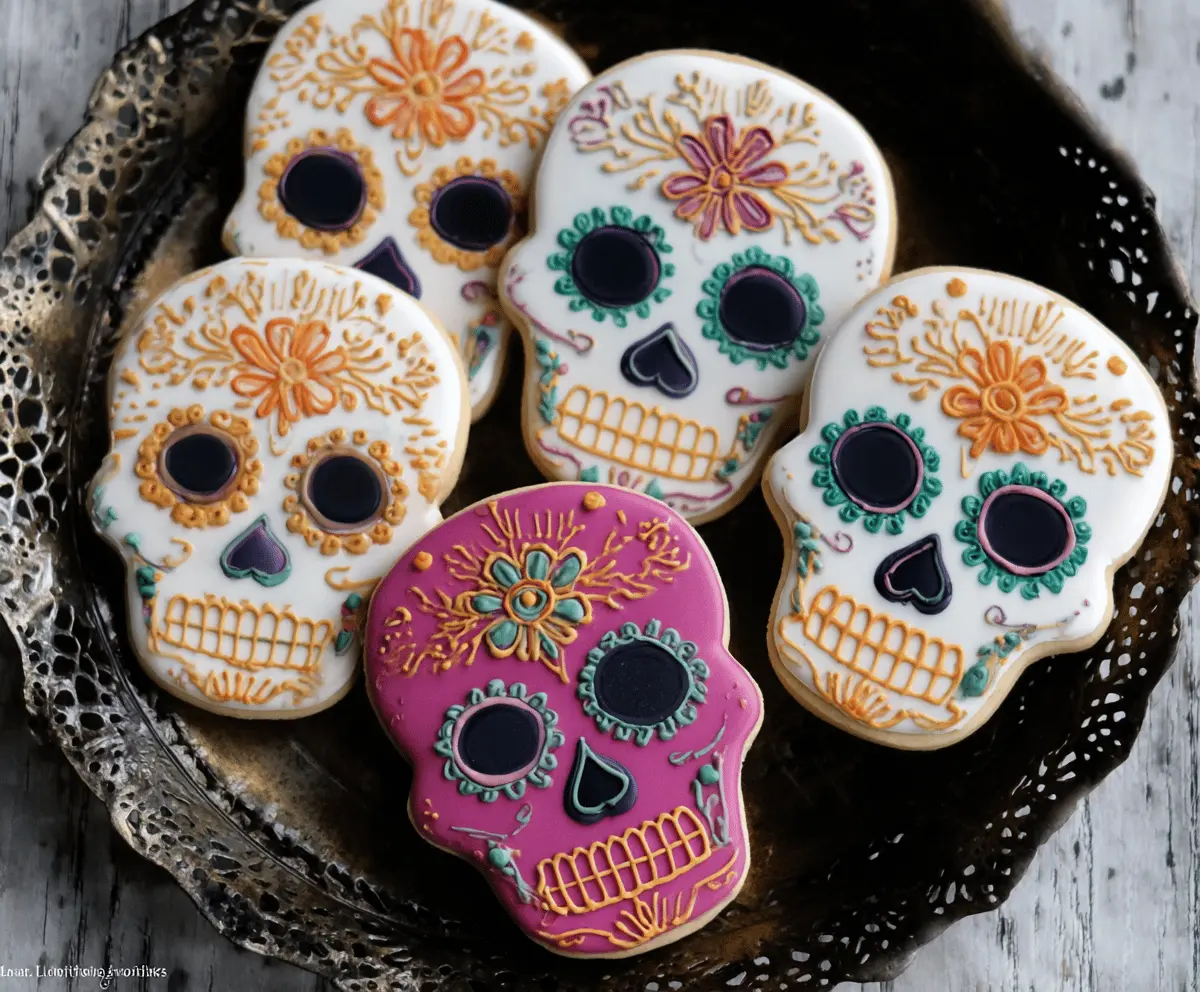
These fun Skull Sugar Cookies are perfect for any festive occasion! With their sweet vanilla flavor and spooky shape, they will surely delight everyone who sees them.
Baking these cookies is a blast! I love decorating them with colorful icing—sometimes I even let my kids join in, and let’s just say our kitchen turns into a “beautiful mess.” 😂
They’re easy to make and make a great treat for Halloween or even a party. I always enjoy a few with my cup of tea—it’s a little bit of festive fun in every bite!
Key Ingredients & Substitutions
All-purpose flour: This is the main ingredient for the cookies. If you’re gluten-free, consider using a gluten-free flour blend, which often works well in cookie recipes.
Unsalted butter: Softened butter gives these cookies their rich flavor and tender texture. You could use margarine or a plant-based butter if you want a dairy-free option.
Granulated sugar: This is essential for sweetness. If you’re looking to reduce sugar, you can use a sugar substitute or coconut sugar; just note that it will change the flavor slightly.
Meringue powder: It stabilizes the royal icing. If you can’t find it, you can use egg whites instead. However, make sure to use pasteurized egg whites to avoid any health risks.
Food coloring: I use gel food colors for vibrant shades without altering the icing’s consistency. Liquid food coloring works too, but you may need more to achieve the same intensity.
How Can I Make Sure My Icing Is Perfectly Smooth?
Achieving smooth royal icing can be a bit tricky, but here’s how to nail it:
- Ensure that your meringue powder is fresh and properly mixed with all ingredients.
- Gradually add water while mixing, aiming for a stiff peak consistency first. Split your icing into thicker and thinner portions for piping and flooding.
- When flooding, use a toothpick to spread the icing, gently nudging it to fill the edges.
- Let each layer dry fully before adding additional colors or patterns; overnight is best to avoid smudging.
Also, don’t be shy with colors! Adding vibrant shades really makes these cookies pop and celebrates the festive spirit!
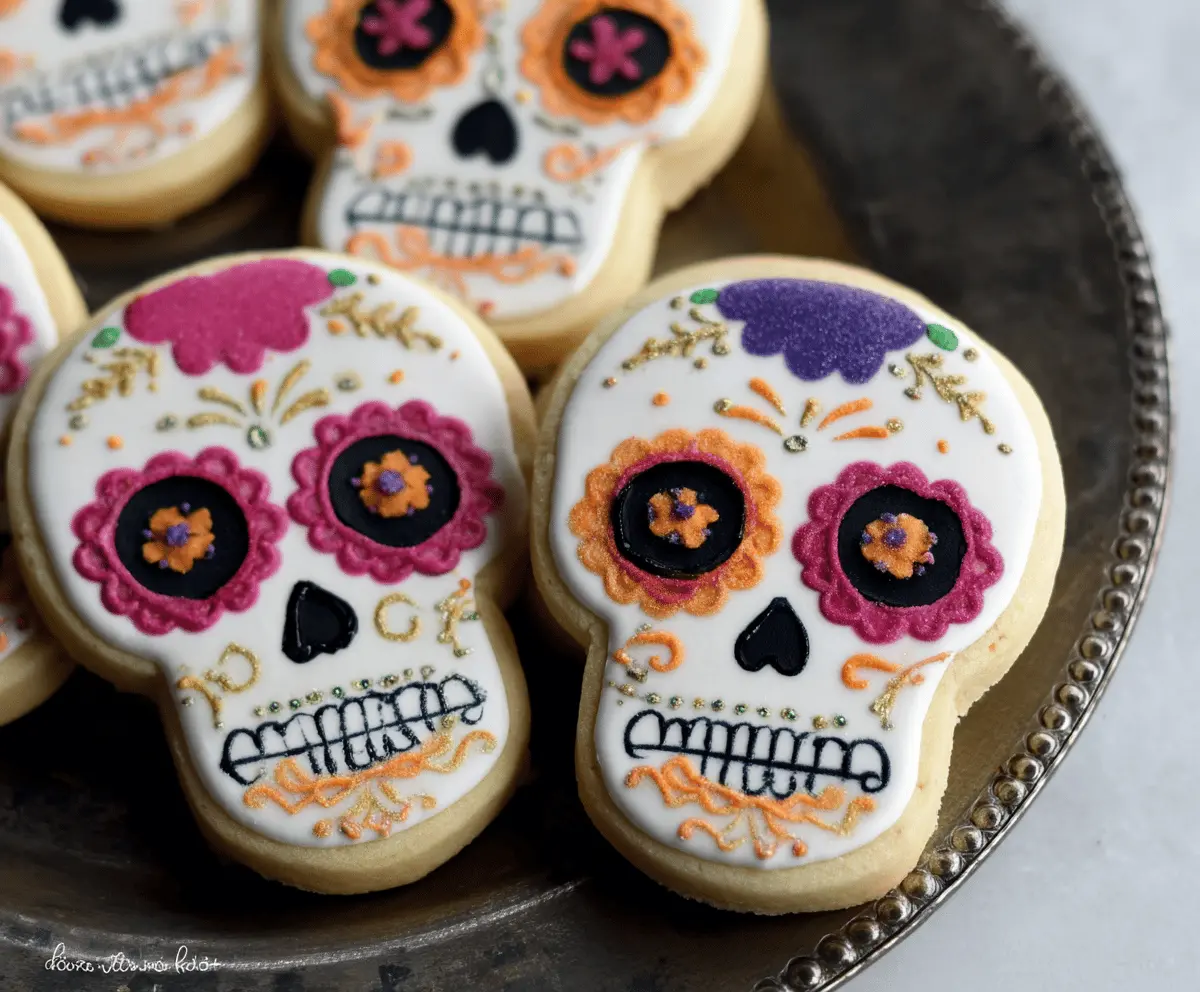
Skull Sugar Cookies
Ingredients You’ll Need:
For the Sugar Cookies:
- 2 3/4 cups all-purpose flour
- 1 tsp baking powder
- 1/2 tsp salt
- 1 cup unsalted butter, softened
- 1 1/2 cups granulated sugar
- 1 large egg
- 2 tsp vanilla extract
- 1/2 tsp almond extract (optional)
For the Royal Icing:
- 4 cups powdered sugar, sifted
- 3 tbsp meringue powder
- 9-10 tbsp water (adjust to icing consistency)
- Food coloring (white, black, pink, orange, green, yellow, purple or as desired for decoration)
How Much Time Will You Need?
This recipe takes about 30 minutes of prep and mixing, followed by about 10-15 minutes of baking. After that, you’ll want to allow time for the cookies to cool and the icing to set. The total time is around 2-3 hours, but it’s best to let the decorated cookies dry overnight for perfect results!
Step-by-Step Instructions:
1. Prepare the Cookie Dough:
Start by whisking together the flour, baking powder, and salt in a medium bowl. In a larger bowl, cream the softened butter and sugar on medium-high speed until the mixture is light and fluffy—this should take about 3 minutes. Next, beat in the egg, vanilla extract, and almond extract until everything is well combined. Gradually mix in the flour mixture on low speed until just combined. Divide the dough into two disks, wrap them in plastic wrap, and chill them in the refrigerator for at least 1 hour.
2. Roll and Cut Cookies:
When you’re ready, preheat your oven to 350°F (175°C). Lightly flour a clean surface and roll out one disk of dough to about 1/4 inch thickness. Use a skull-shaped cookie cutter to cut out shapes and place them on parchment-lined baking sheets, leaving about an inch between each cookie. Repeat for the remaining dough. Bake the cookies in the preheated oven for 8-10 minutes, or until the edges are lightly golden. Allow them to cool on the baking sheet for 5 minutes before transferring them to a wire rack to cool completely.
3. Make the Royal Icing:
In a large bowl, combine the sifted powdered sugar and meringue powder. Gradually add the water while mixing on low speed until the icing reaches a stiff peak consistency. Divide the icing into portions and color each with your desired food coloring. Thin some portions with additional water to achieve a dripping consistency for flooding the cookies.
4. Decorate the Cookies:
Using a piping bag fitted with a small round tip, outline each skull cookie shape with white icing (or use purple for colored bases). Flood the interior with the thinned icing and allow it to dry for 30-60 minutes. Next, pipe intricate Day of the Dead-inspired floral and decorative patterns onto the skulls using various colors like orange, yellow, black, green, pink, and purple. Make sure the decorations dry completely, preferably overnight.
5. Serve and Enjoy:
Once the cookies are fully dry, store them in an airtight container at room temperature. These colorful skull sugar cookies are perfect for celebrations like Día de los Muertos, Halloween, or any festive occasion. Enjoy your delicious and artistic treats!
Can I Use Unsalted Butter Instead of Salted Butter?
Absolutely! Unsalted butter is actually preferred in baking as it allows you to control the salt level in your cookies. Just make sure to add the specified salt from the recipe to achieve the right flavor balance.
How Long Can I Store The Cookies?
You can store your decorated skull sugar cookies in an airtight container at room temperature for up to 1 week. If you want to keep them longer, you can freeze them for up to 3 months. Just make sure they are completely cooled and iced before freezing!
Can I Change the Shapes of the Cookies?
Of course! While this recipe is designed for skull cookies, feel free to use any cookie cutter shapes you like. Just keep an eye on baking time since different shapes may vary in thickness and size.
What If My Royal Icing Is Too Thick?
If your royal icing is too thick for piping or flooding, simply add a tiny bit of water at a time until you reach the desired consistency. For flooding, you want it to be smooth and pourable but still hold its shape when piped.