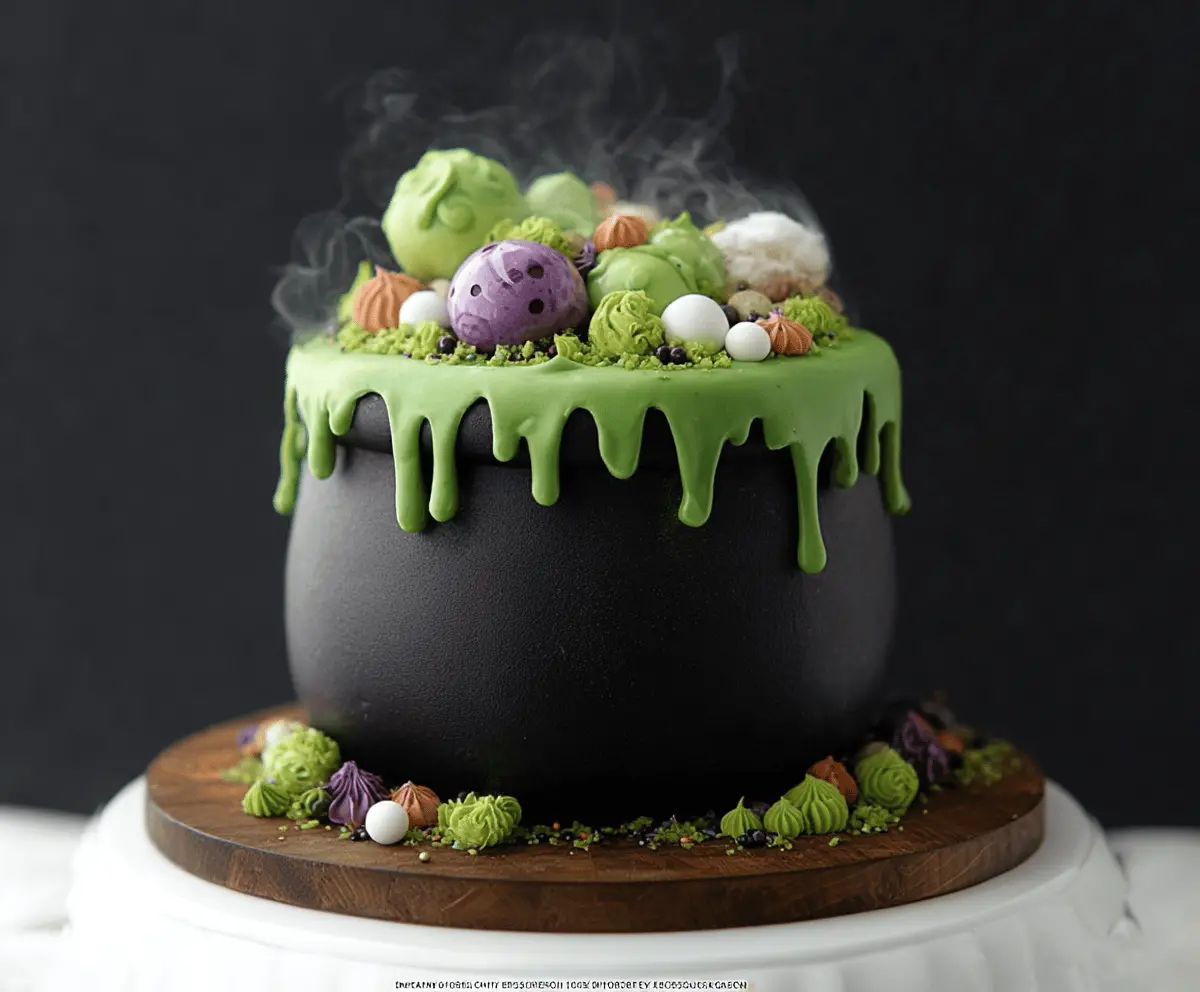
This fun Witch Cauldron Cake is perfect for Halloween! It’s a rich chocolate cake that looks like a bubbling cauldron, complete with colorful frosting and edible spooky decorations.
Who knew a cake could be this cute and creepy at the same time? I love to top it off with gummy spiders—it’s a sweet treat that gives everyone a little scare! 🎃
Making this cake is easy and I enjoy getting creative with the decorations. It’s sure to be a hit at any Halloween party, and trust me, your friends will want a slice!
Key Ingredients & Substitutions
All-Purpose Flour: This is the base of our cake. If you’re after a gluten-free version, you can substitute 1:1 gluten-free flour blend.
Cocoa Powder: Unsweetened cocoa powder adds rich chocolate flavor. If you prefer a lighter taste, you could use Dutch-processed cocoa, but remember this will affect how the cake rises.
Buttermilk: It helps keep the cake moist. If you don’t have it, make a substitute by adding 1 tablespoon of vinegar to a cup of regular milk and letting it sit for 5 minutes.
Black Gel Food Coloring: This gives the frosting a striking black color. If you’re cautious about food dyes, consider using activated charcoal as a natural alternative, but use sparingly.
Decorations: The fun part! If you can’t find round cake balls or chocolate truffles, use different candies or create your own using leftover cake mixed with frosting.
How Do I Properly Fold Ingredients for a Light Cake?
Getting that fluffy texture can be tricky! Here are some helpful tips:
- Always cream the butter and sugar until light and fluffy—this introduces air into the batter.
- When adding dry ingredients, use a gentle folding motion with a spatula to avoid overmixing. This helps maintain that airy texture.
- Alternate adding dry and wet ingredients. Start with dry, then wet, and so on.
What’s the Best Way to Create Drips with Frosting?
Creating those perfect drips can be a messy endeavor, but follow these steps for success:
- Start with melted white chocolate mixed with heavy cream. The consistency should be pourable but not super runny.
- Test the drip on a plate before applying. If it drips too fast, let it cool a bit more.
- Pour or spoon the mixture over the edge of the cake gently, letting it cascade down the sides for that cauldron effect.
Using these insights and tips will help you create a show-stopping Witch Cauldron Cake that’s not only fun to look at but also delicious! Happy baking!
Witch Cauldron Cake
Ingredients You’ll Need:
For the Cake:
- 2 ½ cups all-purpose flour
- 2 ½ tsp baking powder
- ½ tsp baking soda
- ¾ cup unsweetened cocoa powder
- 1 tsp salt
- 1 ¾ cups granulated sugar
- 1 cup unsalted butter, softened
- 4 large eggs
- 1 cup buttermilk
- 2 tsp vanilla extract
For the Black Cauldron Frosting:
- 2 cups unsalted butter, softened
- 6 cups powdered sugar, sifted
- ¾ cup heavy cream or milk
- 2 tsp vanilla extract
- Black gel food coloring
For the Green Drip:
- ½ cup white chocolate chips
- 2-3 tbsp heavy cream
- Green gel food coloring
Decorations (Cauldron “Bubbles”):
- Assorted round cake balls or chocolate truffles in green, white, brown, and black shades
- Green sponge cake crumbs or crushed pistachios (for moss effect)
- Crushed chocolate cookies or Oreos (for dirt effect)
- Edible glitter or shimmer dust (optional, for magical look)
How Much Time Will You Need?
This Witch Cauldron Cake will take about 1 hour to prepare and 1 hour to bake, plus chilling time of about 30 minutes. You’ll need additional time for decorating, so plan for about 3-4 hours total. A little extra time will ensure your cake is perfect for Halloween!
Step-by-Step Instructions:
1. Bake the Cake Layers:
First, preheat your oven to 350°F (175°C). Grease and flour two 8-inch round cake pans to prevent sticking. In a medium bowl, mix the flour, baking powder, baking soda, cocoa powder, and salt. In a larger bowl, beat together the softened butter and sugar until light and fluffy. Then, add the eggs one at a time, mixing well after each. Stir in the vanilla extract. Now, gradually add the dry ingredients and buttermilk in alternating batches, starting and ending with the dry ingredients until everything is just combined. Divide the batter evenly between the two prepared pans and bake for about 25-30 minutes, or until a toothpick inserted in the center comes out clean. Once done, allow the cakes to cool in the pans before transferring them to a wire rack to cool completely.
2. Make the Black Cauldron Frosting:
While your cakes cool, it’s time to make the black frosting. Beat the softened butter on medium speed until creamy. Gradually add in the powdered sugar, mixing on low until combined before beating on high for about 3 minutes until fluffy. Then, add in the heavy cream and vanilla extract, mixing to combine. Slowly add black gel food coloring until you reach your desired shade of black.
3. Assemble the Cauldron Cake:
Once your cake layers are cool, it’s time to assemble! Level the tops of the cakes if needed. Place one cake layer on a cake board or serving stand and spread a generous layer of black frosting on top. Add the second cake layer on top and apply a crumb coat (a thin layer of frosting over the whole cake to hold in crumbs). Chill the cake in the fridge for at least 30 minutes to set. Once chilled, give the cake a final smooth coat of black frosting to resemble a cauldron shape. You can sculpt the edges for a more rounded, cauldron-like effect.
4. Prepare the Green Drip “Potion”:
Next, let’s create that magical green drip! Melt white chocolate chips with heavy cream in a microwave-safe bowl in small bursts (20 seconds), stirring in between until smooth. Add green gel food coloring until you achieve a bright, vibrant green. Allow it to cool slightly until it thickens a bit but can still drip. Now, pour over the top edge of the cake, letting it cascade down the sides like a bubbling potion.
5. Decorate the Cauldron Top and Base:
Time to add those spooky decorations! Arrange assorted round cake balls or chocolate truffles on top of the cake to mimic bubbling potion bubbles. Scatter crushed chocolate cookies around the base to create a “dirt” effect and sprinkle green sponge cake crumbs or crushed pistachios on top for a mossy look. For extra magic, add edible glitter or shimmer dust on the decorations!
6. Final Touches:
Lastly, chill the cake until you’re ready to serve it; this will help set the frosting and drip. When you’re ready to enjoy, slice into this spooky Witch Cauldron Cake and delight in the deliciousness! Happy Halloween!
This impressive cake features a rich chocolate base shaped and frosted to resemble a black witch’s cauldron, with vibrant green “potion” dripping over the sides. Varied spherical decorations on top mimic magical bubbling and add Halloween whimsy. The natural wood slice cake board enhances the enchanted forest vibe, making it the perfect centerpiece for a Halloween party!

Can I Use Cake Mix Instead of Making Cake from Scratch?
Absolutely! If you’re short on time, you can substitute with a chocolate cake mix. Just follow the instructions on the box and then proceed with the frosting and decorations as per the recipe!
How Can I Make This Cake Gluten-Free?
You can easily make this cake gluten-free by swapping the all-purpose flour with a 1:1 gluten-free flour blend. Make sure the baking powder is also gluten-free to ensure the entire cake can be enjoyed by everyone!
Can I Make This Cake in Advance?
Yes, you can bake the cake layers ahead of time! Cool them completely, wrap tightly in plastic wrap, and store in the fridge for up to 3 days, or freeze for longer. Just remember to frost and decorate the cake closer to serving time for the best appearance!
How Should I Store Leftovers?
Store any leftover cake in an airtight container in the fridge for up to 3 days. To keep the frosting from drying out, cover it well. You can also freeze slices for up to 2 months—just thaw in the fridge overnight before enjoying!