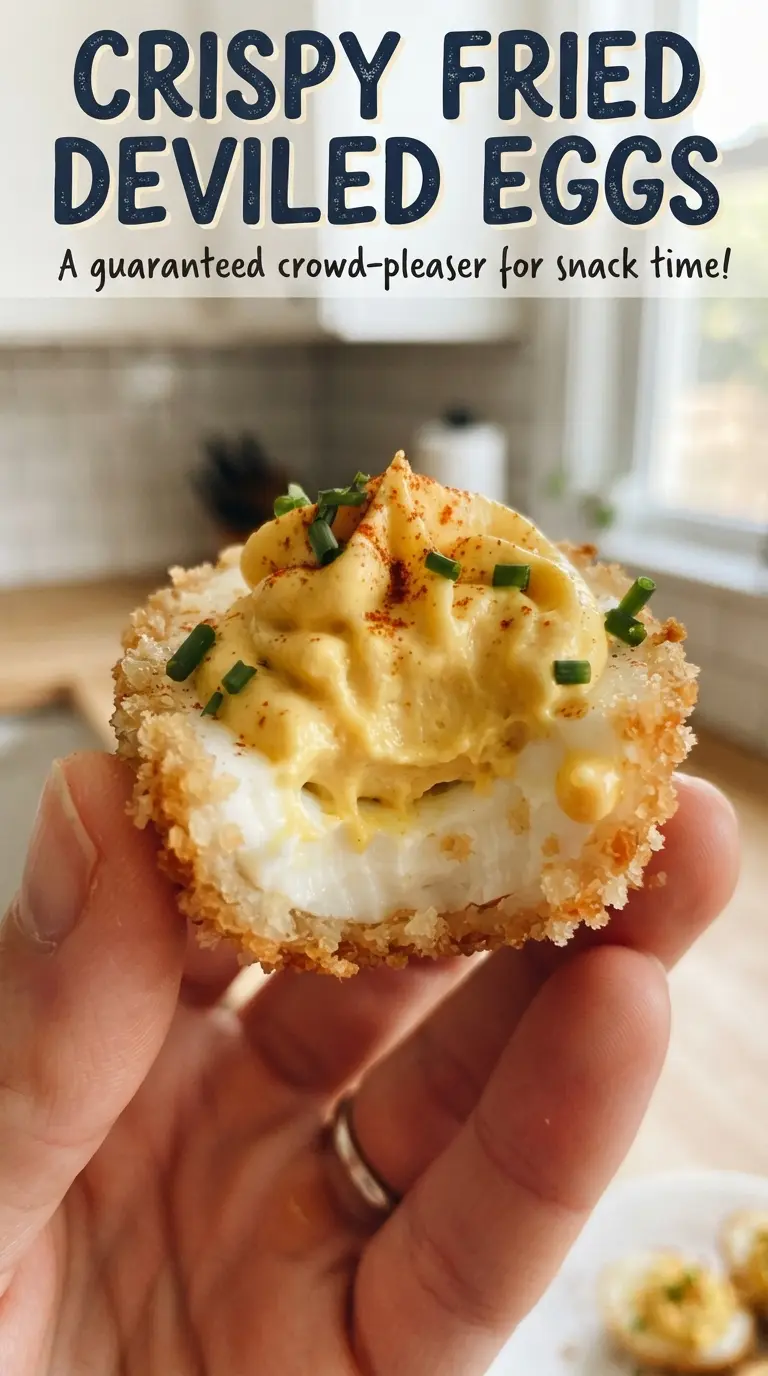
Crispy fried deviled eggs hit that sweet spot between familiar and unexpected: creamy, tangy yolk filling tucked into a shatteringly crisp shell of panko-coated egg white. The first bite gives you crunch, then cool, rich filling, and that contrast is exactly why these disappear fast at parties. They look like a little extra work, but the steps are straightforward and the payoff is big.
The key is treating the egg whites like a proper breaded appetizer instead of a garnish. A light flour layer helps the beaten egg cling, and panko gives you the airy crunch that regular breadcrumbs can’t match. The yolk mixture stays chilled while the whites fry so the filling pipes cleanly into the shells without softening the crust too soon.
Below, I’ll walk through the part that matters most: keeping the breading on the eggs, frying them at the right temperature, and piping the filling so each one looks neat instead of crowded. There’s also a simple make-ahead plan if you want to prep ahead without losing that crisp edge.
The panko stayed crisp even after we topped them with the yolk filling, and the sweet pickle relish gave the filling just enough bite. I made a second batch because the first tray was gone before dinner.
Like this crispy fried deviled eggs recipe? Save it to Pinterest for party trays that need crunch, creamy yolk filling, and a little Southern flair.
The Trick to Keeping the Crunch on Fried Deviled Eggs
The part that trips people up is the order of operations after the eggs are fried. If the yolk filling goes in too soon, the steam from the hot whites softens the crust before it reaches the table. Let the fried halves cool just enough to hold their shape and stop steaming, then pipe in the chilled filling right before serving.
Oil temperature matters here too. Too cool, and the panko drinks up oil and turns heavy; too hot, and the coating browns before the whites have time to warm through. A steady 350°F gives you a deep golden crust in about a minute or two without overcooking the breading.
What Each Ingredient Is Actually Doing in This Dish
- Eggs — Use large eggs for even halves and a filling that pipes neatly back into the whites. Older eggs peel a little easier, which helps keep the whites intact after boiling.
- Mayonnaise — This gives the filling its smooth, plush texture. Full-fat mayo tastes best here; lower-fat versions can make the yolk mixture looser and less rich.
- Sweet pickle relish and Dijon — The relish brings sweetness and little bursts of texture, while Dijon sharpens the filling so it doesn’t taste flat. If you swap the relish for finely minced dill pickle, you’ll get a more savory, less sweet filling.
- Panko breadcrumbs — Panko is what gives these eggs their airy, crisp shell. Regular breadcrumbs will work in a pinch, but the crust will be denser and less craggy.
- Flour and beaten egg — The flour dries the surface just enough for the egg wash to grip, and the egg wash locks the panko in place. Skip either one and the breading is much more likely to slide off in the oil.
- Garlic powder — Just a little in the coating adds savoriness without fighting the filling. It belongs in the breading, not the yolks, because that keeps the flavor balanced.
Frying and Filling the Eggs Without Losing the Shell
Boiling and Peeling the Eggs Cleanly
Start the eggs in cold water, bring them up to a boil, then cover and let them stand off the heat for 12 minutes. That gentle finish gives you firm whites without rubbery edges around the yolk. Chill them fast in cold water before peeling; if you rush the cooling, the shells cling harder and tear the whites.
Mixing the Yolks for a Pipeable Filling
Mash the yolks until there are no dry lumps, then work in the mayonnaise, relish, Dijon, and salt until the mixture is smooth and thick. If it looks loose, it won’t sit high in the fried whites, so chill it for a bit before piping. A piping bag gives the neatest finish, but a zip-top bag with the corner snipped works fine.
Breading the Whites So the Coating Stays Put
Set up your flour, beaten eggs, and panko in separate bowls and coat each half in that order. Press the panko on lightly so it sticks to every curved edge, especially around the cut side where bare spots show up fast. If the flour layer looks thick and pasty, tap off the excess before moving to the egg wash; too much flour keeps the coating from crisping evenly.
Frying to a Deep Golden Crust
Heat about an inch of oil to 350°F and fry in batches so the temperature doesn’t drop. The shells should turn deeply golden in 1 to 2 minutes; if they sit in the oil too long, the whites get tough before the crust sets. Drain them on paper towels and give them a few minutes to lose the worst of the heat before filling.
Finishing at the Last Minute
Pipe the yolk filling into the cooled whites just before serving, then dust with paprika and scatter on the chives. The filling stays neat, the crust stays crunchy, and the paprika adds color without changing the texture. These hold best when they’re assembled close to the table, not half an hour ahead.
How to Adapt These for Different Parties and Dietary Needs
Make Them a Little Brinier
Swap the sweet pickle relish for very finely chopped dill pickles or cornichons. The filling turns tangier and less sweet, which works well if you’re serving these alongside salty snacks or cured meats.
Gluten-Free Version
Use a gluten-free all-purpose flour blend and gluten-free panko. The texture stays crisp as long as the coating still gets a light flour layer before the egg wash; skipping that step usually leads to patchy breading.
Lighter, Less Rich Filling
Replace half the mayonnaise with plain Greek yogurt for a sharper, lighter filling. It tastes fresher, but it won’t pipe quite as smoothly, so chill it well before spooning or piping.
Storage and Reheating
- Refrigerator: Store the fried egg whites and yolk filling separately for up to 2 days. Once assembled, the coating softens fast.
- Freezer: Freezing isn’t a good fit here. The filling turns grainy and the crust loses its crunch when thawed.
- Reheating: Re-crisp the fried whites on a baking sheet in a 375°F oven for a few minutes, then cool briefly before filling. Don’t microwave them; it softens the coating and makes the oil taste heavy.
Answers to the Questions Worth Asking

Crispy Fried Deviled Eggs
Ingredients
Equipment
Method
- Place the 12 large eggs in a pot, cover with cold water, and bring to a boil. Cover, remove from heat, and let stand 12 minutes, then chill, peel, and halve.
- Mash the yolks with mayonnaise, sweet pickle relish, Dijon mustard, and salt until smooth. Transfer the filling to a piping bag and chill.
- Coat each egg white half in all-purpose flour, then dip in the beaten eggs. Roll in panko breadcrumbs mixed with garlic powder to coat evenly.
- Heat 1 inch of vegetable oil to 350F. Fry the whites in batches for 1-2 minutes until golden, then drain on paper towels.
- Cool for 5 minutes, then pipe the yolk filling into the crispy egg white halves. Dust with paprika and chives and serve right away with crisp shells.