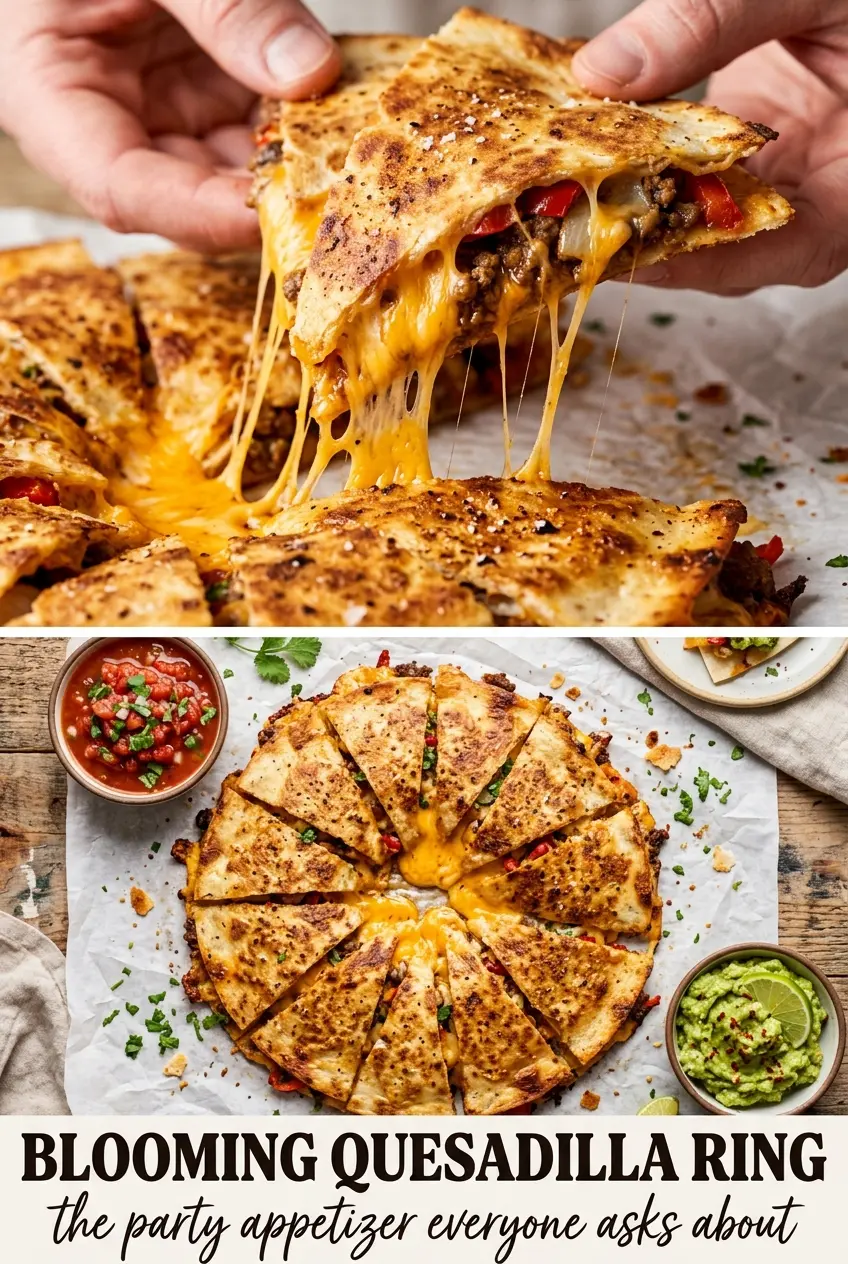
Golden quesadilla triangles arranged into a blooming ring turn a simple skillet dinner into the kind of appetizer people drift back to all night. The edges crisp up, the cheese melts into the filling, and the whole platter lands with that satisfying pull-apart moment that makes everyone reach in before the dip is even gone.
What makes this version work is the balance inside each triangle. The beef brings the heft, the peppers and corn keep it from feeling heavy, and the cheddar gives you that stretchy, salty melt that holds the filling together. Cutting the folded tortillas into triangles before frying gives you more browned surface area than a whole folded quesadilla, which means better crunch and cleaner stacking when you build the ring.
Below, you’ll find the one timing detail that keeps the filling inside the tortillas instead of spilling into the pan, plus a few smart ways to adapt the ring for different crowds. The center dip matters here too, because it ties the whole platter together instead of leaving you with a pile of quesadillas and nothing to drag through them.
The triangles held together perfectly and the cheese got that crispy edge where it leaked out a little. I served it with the salsa sour cream in the middle and the whole platter disappeared before I could put out the queso.
Love the crispy, stacked Blooming Quesadilla Ring? Save it to Pinterest for game nights, parties, and any spread that needs a show-stopping cheesy center.
The Crisp-to-Melt Balance That Keeps These Triangles from Falling Apart
The mistake with stacked quesadilla appetizers is loading in too much filling or frying them before the cheese has had a chance to do its job. Cheese is the glue here. It should melt into the beef and vegetables enough to hold everything together, but not so much that the tortillas slide apart when you cut them.
Another thing that matters is heat. Medium-high gives you a browned tortilla before the filling has time to dry out. If the skillet is too cool, the tortillas absorb oil and turn soft instead of crisp. If it’s too hot, the outside darkens before the cheese inside turns gooey, and the ring loses that clean layered look.
- Folded before cutting: Folding the tortilla in half first keeps the filling centered and gives you a sturdy wedge shape that stands up well in the platter.
- Cheese on both sides of the filling: A little cheese under and over the beef mixture helps seal the edges as it melts.
- Cook in batches: Crowding the pan drops the temperature fast, which is how you end up with pale, greasy wedges instead of crisp ones.
What Each Ingredient Is Actually Doing in This Ring
- Flour tortillas: Large flour tortillas are the best choice because they fold without cracking and brown into crisp, sturdy wedges. Smaller tortillas can work, but the ring looks tighter and the filling is harder to distribute evenly.
- Cheddar cheese: Cheddar gives you the sharp melt and the pull that make this appetizer worth serving. A medium or sharp cheddar is best; pre-shredded cheese works in a pinch, but freshly shredded cheese melts smoother because it doesn’t have anti-caking starch on it.
- Ground beef: The beef gives the quesadillas enough substance to feel like an actual snack, not just melted cheese. Season it well and drain off excess grease so the tortillas don’t go soggy.
- Bell peppers, onion, and corn: These keep the filling colorful and juicy. Dice them small so the triangles stack neatly and don’t tear as you arrange the ring.
- Sour cream and salsa: Mixed together, they make a quick center sauce that cuts the richness of the cheese. If your salsa is very loose, use a thicker one so the center doesn’t run across the platter.
- Queso dip: This is the extra warm dip on the side that makes the platter feel generous. Store-bought queso is fine here, especially if you’re already managing a skillet full of wedges.
Building the Ring Without Losing the Crunch
Layering the Filling Evenly
Spread the cheese first, then the beef and vegetables, then finish with a little more cheese so the top layer helps hold everything in place. Keep the filling a little inside the edge of the tortilla; if you pack it all the way to the rim, the cheese will leak into the pan before the wedge firms up. The goal is a compact half-moon that slices cleanly and doesn’t burst when you turn it.
Frying Until the Edges Set
Cook the wedges until the first side is a deep golden color and you can see the cheese starting to melt out at the seam. That little bit of seepage is good; it means the filling is binding. If the pan looks dry, add a touch more oil between batches. Use a spatula to press gently on the wedges for a second or two so the seam seals and the surface gets even contact with the skillet.
Arranging the Platter
Stand the cooked triangles slightly overlapped in a circle so the cut edges face out and the browned surfaces show. Build the ring while they’re still warm enough to support themselves. If they cool completely first, they slump and the shape looks flat instead of blooming. Spoon the sour cream and salsa mixture into the center and set the queso beside the platter, not under it, so the wedges stay crisp.
Make it with chicken instead of beef
Use shredded cooked chicken in the same amount and season it well before layering. Chicken gives you a lighter filling and lets the peppers and corn come forward a little more, but it won’t have the same rich, savory depth as beef.
Make it vegetarian without losing the structure
Skip the beef and add black beans, extra corn, and a little more cheese for body. Drain the beans well so the filling stays thick enough to keep the wedges from sliding apart in the pan.
Make it gluten-free with corn tortillas
Corn tortillas can work if you use smaller portions and handle them gently, but they don’t fold as neatly as flour tortillas. Warm them first so they don’t crack, and expect a thinner, more delicate ring that eats more like crisp wedges than soft folded quesadillas.
Storage and Reheating
- Refrigerator: Store leftovers in an airtight container for up to 3 days. The tortillas will soften a bit as they sit, but the filling stays usable.
- Freezer: These freeze well if you keep the wedges in a single layer until firm, then wrap and store them. Freeze the cooked quesadillas without the sour cream topping; the dip doesn’t thaw well.
- Reheating: Warm them in a skillet or hot oven so the tortillas crisp back up. The biggest mistake is microwaving them, which turns the wedges limp and makes the cheese oily.
Answers to the Questions Worth Asking
Blooming Quesadilla Ring
Ingredients
Equipment
Method
- Layer each flour tortilla with shredded cheddar cheese, cooked seasoned ground beef, diced red bell pepper, diced green bell pepper, diced onion, corn, and chopped cilantro, so the center is packed evenly. Fold each tortilla in half, then cut into triangles while keeping the filling trapped inside.
- Heat oil in a large skillet over medium-high heat until shimmering. Working in batches, cook the quesadilla triangles for 2-3 minutes per side, flipping once when the underside is golden and the cheese is visibly melted.
- Arrange the cooked quesadilla pieces in a circular ring on a platter, standing them up slightly overlapped so the cheese seams show between layers. Mix sour cream with salsa, spoon the mixture into the center, and serve immediately with warm queso dip on the side.