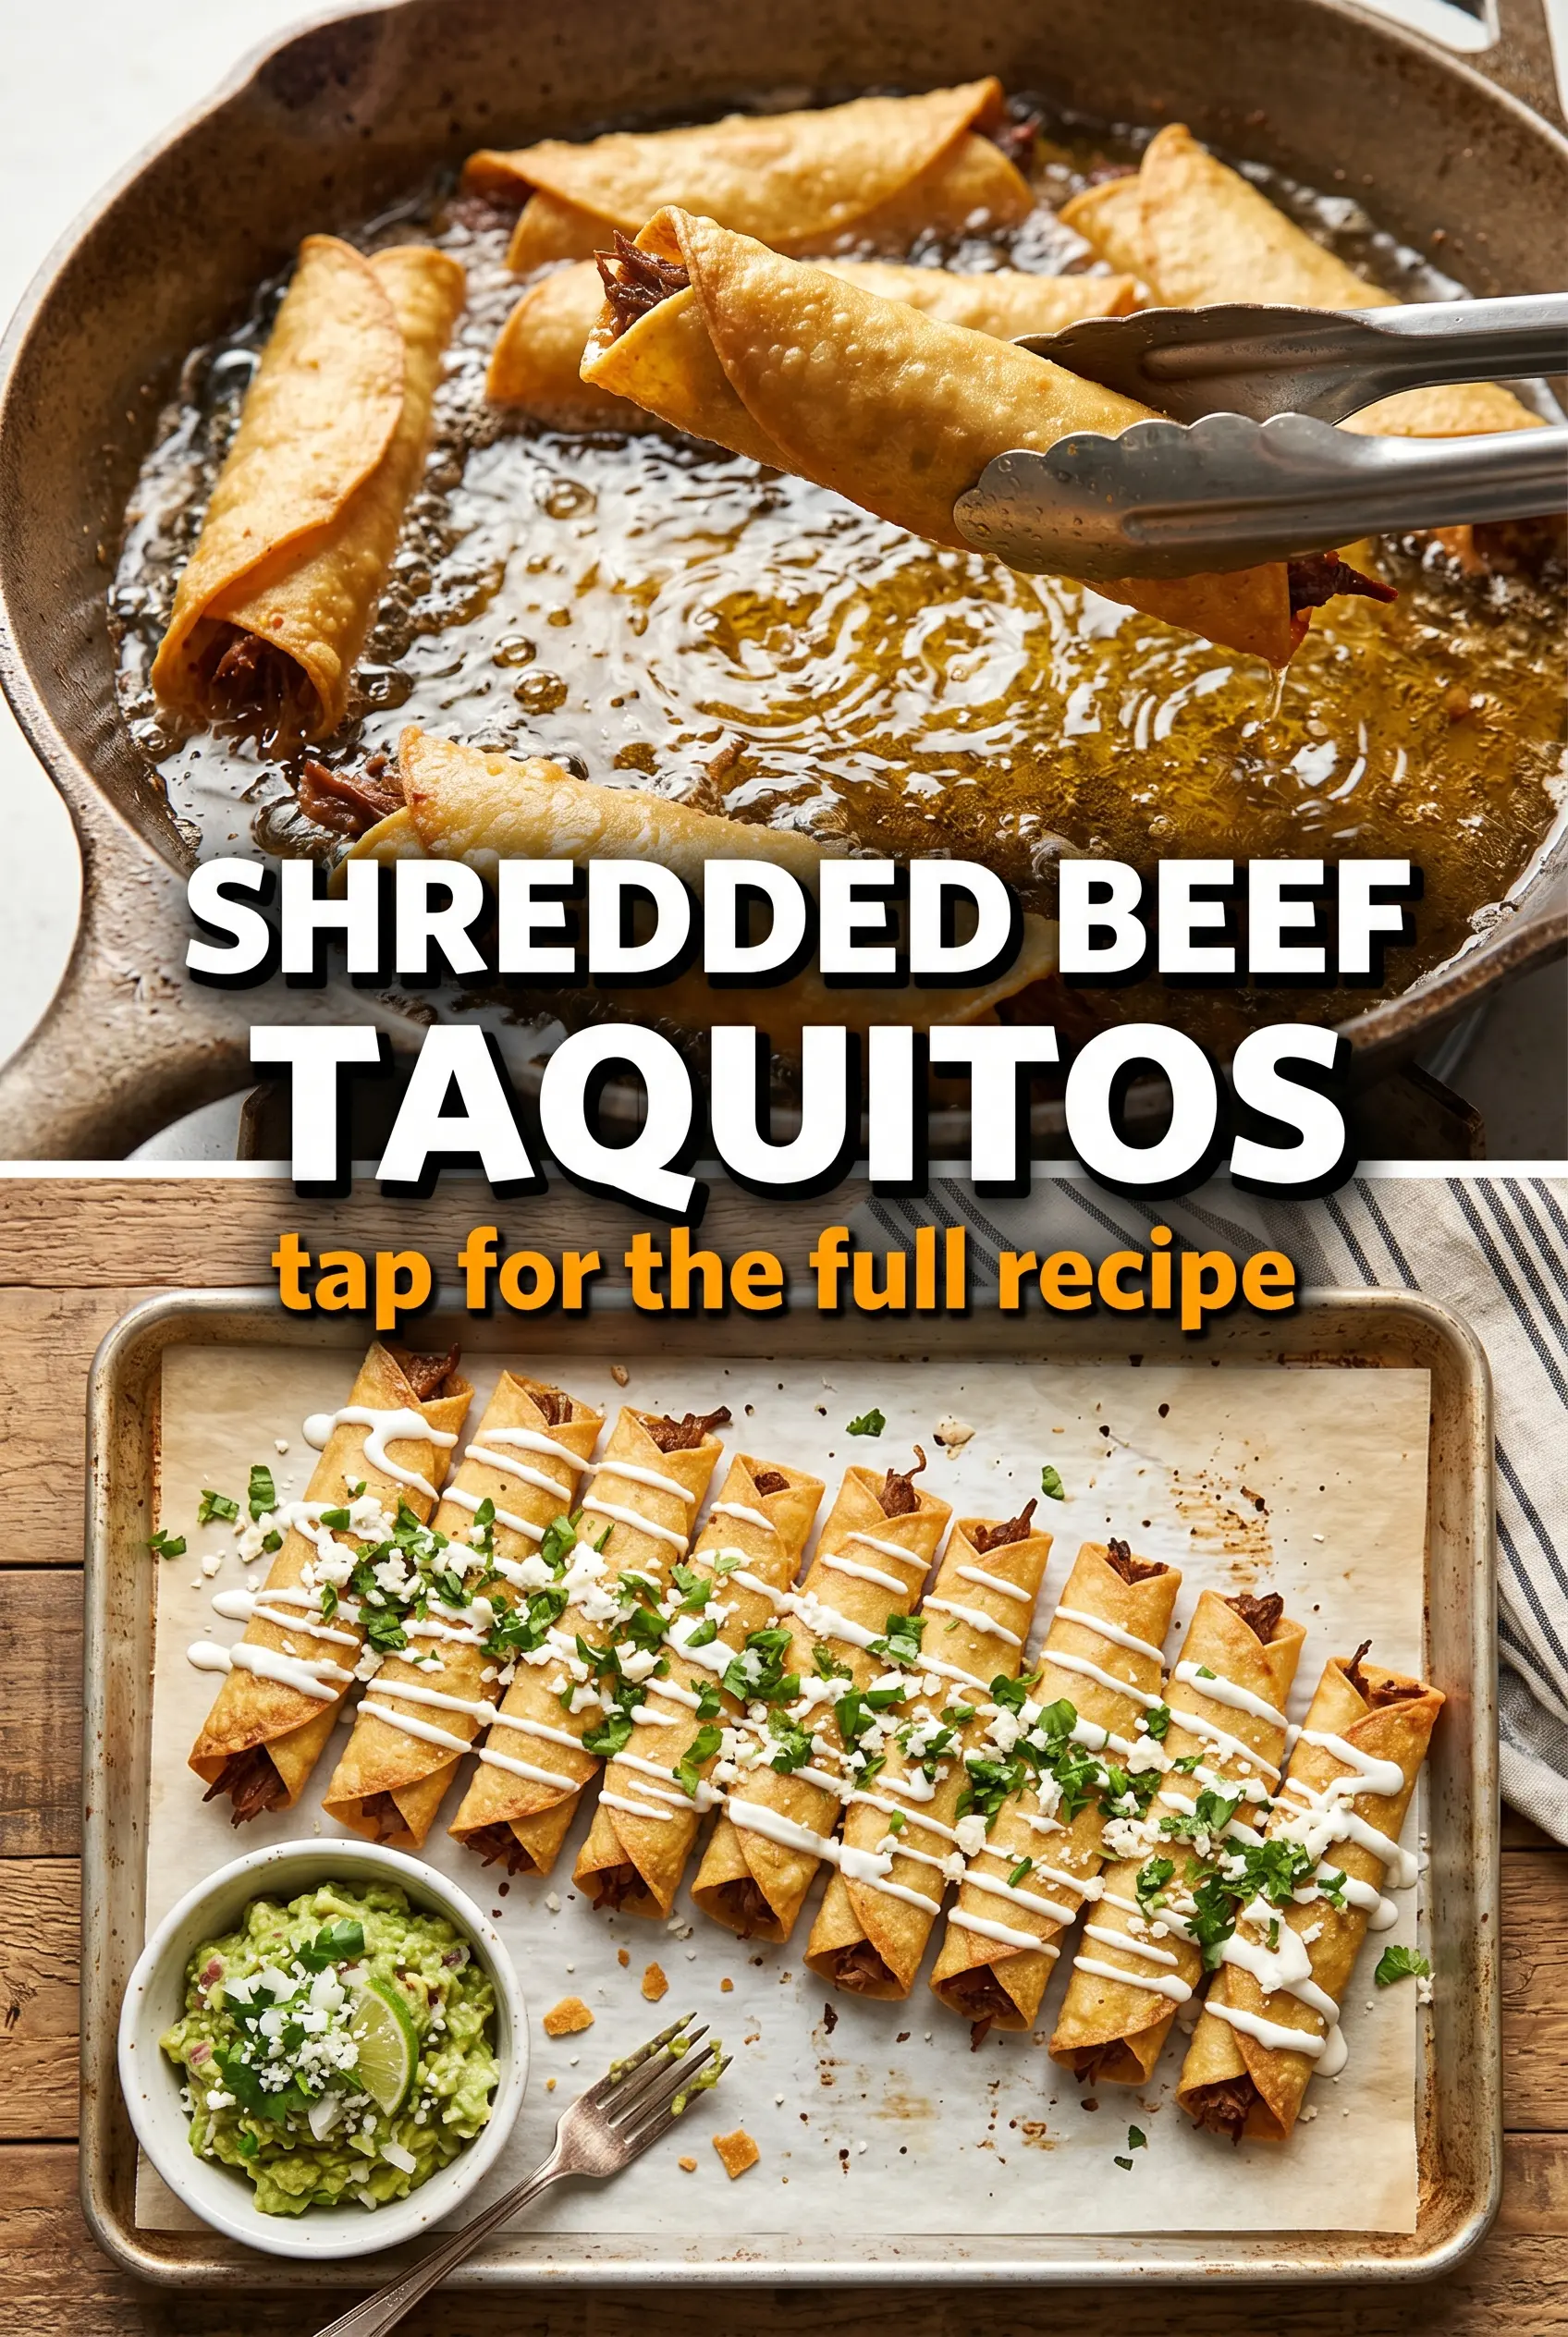
Crispy shredded beef taquitos hit that sweet spot between snack and dinner: crackly on the outside, tender and savory in the middle, with just enough cheese to hold everything together. The best part is the contrast. A hot, brittle shell gives way to juicy beef, chopped onion, and cilantro, then the cool sour cream on the side pulls the whole plate together.
What makes this version work is the balance in the filling. The beef gets a small amount of salsa so it stays moist without turning soggy, and the onion and cilantro cut through the richness of the meat and cheese. Using small flour tortillas matters here too. They roll more easily than larger ones and hold their shape better in the oil, which means fewer blowouts in the pan and more taquitos that fry up evenly.
If you’ve had taquitos split open or go greasy, the fix is in the roll and the oil temperature. A tight seam, steady 350°F oil, and quick frying are what give you that clean, crisp shell. Below, I’ve included the little details that keep the filling in place and the outside crunchy instead of heavy.
I followed the filling exactly and the taquitos stayed rolled in the oil instead of popping open. The beef stayed juicy, the tortillas got crisp in about 2 minutes a side, and the sour cream on top was the perfect finish.
Save these shredded beef taquitos for the nights when you want a crisp fried dinner with a tender filling and minimal cleanup.
The Trick to Taquitos That Stay Rolled, Not Split Open
Most taquitos fail in the same two places: the filling is too wet, or the tortilla isn’t rolled tightly enough to seal itself before it hits the oil. This version keeps the beef mixture compact by using just enough salsa to season the meat without soaking it. That matters because excess moisture turns to steam, and steam is what pushes a seam open from the inside.
The other thing that helps is the cheese. It melts just enough to act like a binder, but it doesn’t need to flood the filling. If you pack the tortillas too full, they will burst no matter how carefully you fry them. Keep the filling in a narrow line, roll firmly, and let the oil do the rest.
What Each Ingredient Is Actually Doing in These Taquitos
The beef is the backbone here. Use shredded beef that already has good seasoning and enough moisture to feel juicy on its own, because the taquitos fry fast and won’t have time to recover bland meat. If you only have very dry leftover beef, stir in an extra spoonful of salsa or a splash of broth before rolling.
Small flour tortillas are the right choice for this style because they flex without cracking. Corn tortillas can work, but they need to be warmed until pliable and they tend to read more like traditional rolled tacos than the softer, sturdier taquito here.
- Shredded beef — The filling needs meat that pulls apart in strands, not chunks. Shorter shreds roll more neatly and stay put inside the tortilla.
- Cheddar cheese — Adds richness and helps hold the filling together as it melts. A sharper cheddar gives you more flavor without needing extra salt.
- Diced onion — Brings crunch and sharpness so the filling doesn’t taste flat after frying. Dice it small so it softens inside the taquito instead of poking through the tortilla.
- Cilantro — Lifts the beef with freshness and keeps the filling from tasting heavy. If you’re not a cilantro fan, chopped parsley works for color, but it won’t taste the same.
- Salsa — Adds seasoning and just enough moisture to bind the filling. Thick salsa is better than thin here, because watery salsa leads to soggy taquitos.
- Small flour tortillas — They roll tightly and brown evenly in hot oil. If yours crack when you roll them, warm them briefly in the microwave under a damp paper towel first.
Frying the Seam Side First for a Better Crunch
Mix the filling just until it holds together
Stir the shredded beef with onion, cilantro, salsa, salt, and pepper until everything is evenly coated. You want the mixture to look moist but not wet enough to pool in the bowl. If liquid collects at the bottom, the filling is too loose and will leak during frying.
Roll each taquito with a tight, narrow center
Lay a tortilla flat, add about 2 tablespoons of filling and a small pinch of cheese in the center, then roll it snugly from one side to the other. Keep the filling in a short line instead of spreading it wide; that gives you a cleaner roll and a better seal. If the tortilla fights you, warm it for a few seconds so it softens and bends instead of tearing.
Fry in hot oil without crowding the pan
Heat the oil to 350°F and fry the taquitos in batches. If the oil is cooler than that, the tortillas soak up grease before they crisp; if it’s too hot, the outside browns before the center tightens. Fry for about 2 minutes per side until deeply golden and blistered, then move them straight to paper towels so the shells stay crisp.
How to Adapt These Taquitos for Different Tables
Bake Them Instead of Frying
Brush the rolled taquitos lightly with oil and bake them at 425°F until crisp and browned, turning once. They won’t have the same shattering crunch as fried taquitos, but they still get a good bite and use much less oil.
Make Them Gluten-Free
Swap in small corn tortillas and warm them until they bend without cracking. Corn tortillas bring a more classic flavor, but they need a little extra care because they split more easily than flour when rolled too cold.
Use Chicken or Pork Instead of Beef
Any well-seasoned shredded meat works here as long as it isn’t dripping wet. Chicken will taste lighter, pork will taste richer, and both benefit from a little salsa mixed in so the filling stays cohesive.
Storage and Reheating
- Refrigerator: Store cooked taquitos in an airtight container for up to 3 days. The shell softens a bit in the fridge, but they still re-crisp well.
- Freezer: Freeze after frying on a sheet pan, then transfer to a freezer bag for up to 2 months. Reheat from frozen for the best texture.
- Reheating: Use an oven or air fryer at 375°F until hot and crisp again. The common mistake is microwaving them, which turns the tortilla soft and chewy instead of bringing the crunch back.
Answers to the Questions Worth Asking
Shredded Beef Taquitos
Ingredients
Equipment
Method
- Combine shredded beef, diced onion, cilantro, salsa, salt, and pepper in a bowl until evenly mixed and well coated.
- Taste the mixture and adjust with more salt and pepper as needed for a balanced filling.
- Lay out the tortillas and spoon about 2 tablespoons of the beef mixture into the center of each tortilla.
- Add a small handful of shredded cheddar cheese on top of the beef mixture in each tortilla.
- Roll the tortillas tightly into cylinders with the seam on the bottom, securing with a toothpick if needed so they hold their shape.
- Heat vegetable oil to 350°F in a Dutch oven.
- Fry the taquitos in batches at 350°F until golden and crispy, about 2 minutes per side, turning once when the underside is crisp.
- Drain the fried taquitos on paper towels until the surface looks dry and no longer glossy with oil.
- Serve taquitos warm with sour cream and additional salsa on the side, with a visible creamy dollop and bright salsa for contrast.